Friday, September 13, 2019

Using Redis as Data Store

Redis, if you're not familiar with it, is a high performance, in-memory, key-value database.  It is transient in nature, meaning it doesn't have a built-in means to store data to non-volitile memory (you know solid state drives, hard disk, optical disk, magnetic tape, floppy disk, barrel memory, clay cuneiform).  Redis has it's own protocol that is for the most part ASCII/UTF-8 based with support for non-ASCII/UTF-8 keys and values.  Redis has a relatively simplistic security model with a single optional password for access.  Further Redis doesn't support in-transit encryption directly and relies on firewall and encrypted proxy layers instead.

There are a handful of use cases for Redis.  Most of these focus on increasing the performance of web applications by holding data in memory instead of a more complex data store like a relational database, or NoSQL store like Mongo.  Even thought it's relatively straight forward, Redis has advanced features like transactions and clustering with automatic fail-over.  Advanced features aside, I'd like to focus the caching use case with a couple different models, such as Write-Through and Least Recently Used.

Write-Through Caching

Write-Through Caching (WTC) works best when Redis has enough memory to store all of the data you will use.  Items in a WTC typically are never evicted, beause a WTC doesn't lazy-load.  From this standpoint you could call a WTC an in-memory database that trades performance for reliability.  Redis counters this with sentinal capabilities.  But automatic-failover doesn't help much if you have a complete power failure in your data center(s), or need to relocate your servers, and don't have a hibernate of option.  So, you'll need to write-through to your backing store and have a method to resume from a full stop.

What is write-through you ask?  Basically, write creates, updates, and deletes to Redis when ever you would update your backing store.  This way the two are always synchronized.  Redis supports transactions, so it is possible to implement a distributed commit strategy. Think of something like this:

begin_redis_transaction();
update_redis();
if (update_backing_store() is successful) 
    commit_redis_transaction();
else
    roll_back_transaction();

When you read from a WTC, just query Redis, you don't need to do anything with the backing store.  Except, if your Redis server stops for some reason, you'll need to pull all of the records from the backing store and update Redis w/o the write-through logic above.

Some of the benefits of a WTC:
  • Guaranteed performance - reading is constant you don't pay a price for cache misses, because if it's not there, it doesn't exist.
  • Guaranteed accuracy - the cache doesn't rely only on item life expectancy to update with new values.
WTC Considerations:
  • Memory - the Redis data store must be big enough to hold all of your cacheable data
  • Resumption - after a catastrophic failure, it will take some time to reload the Redis store from the backing store, more for the more items you have.

Wednesday, September 19, 2018

JSON Parsing

Just because it's the current thing for exchanging information over the interwebz, and because I've needed a method to serialize custom properties for SAFMQ, I've developed a couple of JSON parsers.

I know, I know...  There are literally hundreds of JSON parsers (well tens for C++), but a bunch had requirements like C++11 (which is kinda old, but pretty new as far as SAFMQ goes).

So I write one in C++, it uses std::vector<T>, std::map<K,T>, and std::string to manage it's contents.  I also features custom validators to check numeric formats, and works on a byte-by-byte method of parsing, so it's pretty fast.  Only slowed down by the time to place items in the vector/map for arrays and object members.  Since it's C++ I overloaded the operator[](int) and operator[](const std::string&) to access items and members, and added methods to make it seem like a vector or map when you access contents.  There's  a set of cast operators to retrieve integers, doubles, and strings.  I snached up some CppUnit code to throw a bunch of tests at it.  CppUnit doesn't have code coverage built in, so my goal was to manually ensure I covered every branch.  I feel pretty good about it.

Then yesterday I decided to do the same in Java.  I'm new to IntelliJ that we use at work so it was an opportunity to get more familiar with the IDE as well as check code coverage with jUnit what not.  Like the C++ version it does a byte-by-byte parse, and leverages ArrayList<T> and HashMap<T> for items and members.  Java doesn't have custom operators, so in come getters an setters.  Overall, I'm pretty pleased, although I had to do some weird steps to ensure 100% code coverage (if/throw on a single line, remove an early check and put it deeper in the method, which lead to sub-optimal code).  Most of it was because the overall structure of the program, double checking conditions in subsequent code, etc.  Built this one with 100% coverage in a day, so I feel pretty good about it.


Sunday, August 26, 2018

SAFMQ 0.8.5 Released today

Hot off the press, SAFMQ 0.8.5, with updates for MacOS X, FreeBSD 11, Fedora Core 28, and test compilation for 64 bit Windows.  The 64 bit installer for windows is on it's way...

Check out the latest files: https://sourceforge.net/projects/safmq/files/SAFMQ/SAFMQ%200.8.5/

Grab documentation on the project site:  http://safmq.sourceforge.net

Friday, August 17, 2018

Store and Forward Message Queue

I'm looking back through my blog posts and it seems I've never posted about my long lived open source project SAFMQ.

Just recently I've had some time to get back to it... As I'm looking at the traffic at Source Forge, and I'm a little downtrodden.  Back in the day (prior to 2014) there was such a thing as FreshMeat which became Freecode and died.  Back then you could advertise your open source project, and you'd get a bunch of traffic sent your way.  I'm not really sure why Freecode/FreshMeat went away, but the official reason was "The Freecode site has been moved to a static state effective June 18, 2014 due to low traffic levels and so that folks will focus on more useful endeavors than site upkeep."  I'm not sure what that really meant, because there were nearly 40 packages announced that day...

Anyway, I'm back at, and some of the things I've been looking into are making it Mac OS compatible, improving some of the not-before/not-after X.509 cert management, and gathering performance tests on a bunch of platforms for comparisons.  More to come

Tuesday, July 31, 2018

NPM and External Dependencies for PowerBI Custom Visuals

The custom slicer I built for Power BI has a few advanced UI features, clickable DIVs, a slider control, text input with validation.  It may have been possible to develop all of those interactions myself, but why intent the wheel.  jQuery and jQuery UI really add all of the features and simplify a lot of the coding.

Here's a step-by-step process that I used to get jQuery and jQuery-UI into my visual.
  1. Start with Use Developer tools to create custom visuals.
  2. Then add jQuery and the strong types to be TypeScript friendly:
    1. npm install jquery
    2. npm install "@types/jquery"
  3. Add jQuery UI (this was the hard part, see below).
I'm new to Node.js projects (do I capitalize Node.js, yes?), and I'm still getting familiar with the overall structure.  The thing I'm getting off the bat is that the node_modules folder is special.  For one, it should be 100% managed by npm.  That means that stuff placed there shouldn't be committed to your code repository (I'm not there 100%, but I'm getting close). 

Full disclosure, I started by putting some non-TypeScript code there that I had written (CSS, custom JavaScript, etc.).  But it's not an npm package, so it shouldn't be there. I moved it to my src folder. Next, I tried and tried to use an npm package for jQuery UI.  I tried the jquery-ui package, but it has to be built.  Then I got some new info and tried the jquery-ui-dist package.  But, I'm getting an error when compiling.  Near the very last line of jquery-ui.css there's a rule:

filter: Alpha(Opacity=.3);

But, Node.js doesn't understand that rule and throws the error "error  LESS  style/visual.less : (1307,23) Could not parse alpha".  I did some searches and the only way to fix it is to modify the code.  I don't want to modify the code in  node_modules.

My fix was to download the vanilla version of jQuery UI.  Then cherry pick only the assets I need to be successful.  I grabbed jquery-ui.js, jquery-ui.min.js, and the minimal items from the css folder in the distribution.  For the timebeing they are in a jquery-ui folder in node_modules.  I know I just got done writing that this was bad, so my next step will be to move them to the src folder.  Optimally, it would be great if I could just use the jquery-ui-dist package, but it seems that I can't, yet...


Removing Document Edit Protections from Word DOCX files

Ever wanted to edit a Word document that had editing disabled?  Typically you need to have a password to be able to edit the file, but if you really want to get rid of it, there's a pretty straight forward process.

  1. Unzip the DOCX file (it's just a ZIP file after all) into a directory some where.
      • This produces the following:
        • [Content_Types].xml
        • _rels (sub directory)
        • docProps (sub directory)
        • word (sub directory)
  2. Using your favorite text editor (I used VIM), edit the file word/settings.xml
  3. Remove the XML tag:  <w:documentProtection/>
  4. Zip up the three (3) directories and the [Content_Types].xml file and make sure the extension on the zip file is DOCX.

You're ready to go.  You've now removed the protections on a Word Document.  Be careful with your new found powers, young padawan.

Friday, July 6, 2018

Power BI Custom Visual Design Considerations

Back at the Power BI custom slicer... We ran into an intermittent bug that would happen when you first open a report and when you switch between tabs.  The root cause comes from a feature where the first or last item is automatically chosen, something handy when you want to see the latest data based on a range of dates.

Some background on Power BI Custom visuals, they are TypeScript (JavaScript) based, and are defined by the interface IVisual.  As of v1.11.0, the IVisual interface has three methods:
  • update(options: VisualUpdateOptions): void
  • destroy?(): void
  • eumerateObjectInstances(options: EnumerateVisualObjectInstancesOptions): VisualObjectInstanceEnumeration
There's also a constructor that receives a VisualConstructorOptions object, and a bunch of methods that aren't documented, yet.  Turns out that update() is called immediately after the constructor, and after every call to ISelectionManager.applySelectionFilter() (APF here on, which changes the filters applied to any connected visuals).  When APF is called and the selection is the same as it was before, there's a good chance that it won't trigger an update, which is nice because people like to double click stuff.

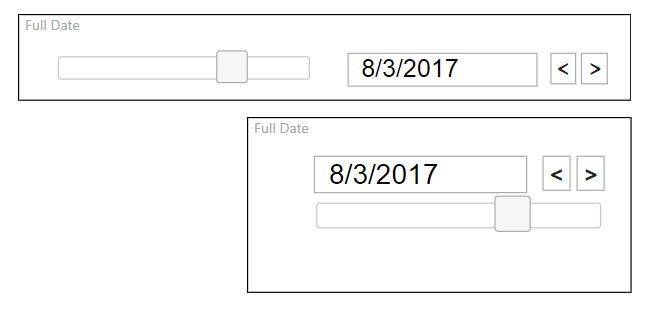
Here the slider sent an on change when the selected value was updated programmatically.

The kicker is when your custom visual changes the selection and calls APF during a call to update().  Mine did, on every call, and the only thing keeping it from an infinite loop of updates was the under-the-covers check to see if the selection was the same.  But what if there was a delay in the selection updates, and it caused a cycle between an old selection and the one that was just forced?  Infinite loop...

I tried all kinds of things.  First, I thought that there was a direct path between APF and update(), so I put some Boolean locks around the code calling APF to avoid stack overflows and stop the loop.  But, even though it looks like it on the stack inspector, the selection changed events are detected in some sort of async loop instead inline with stack execution.  Then I tried to make the code as clean as possible, but that didn't help.  The piece of information I was missing?  The very first call to update() after the constructor restored the previous selection filter w/o having to call APF.  Support on the Power BI board, said to never call APF from update(), because it can cause an infinite loop, and testing showed that the previous selection was always pre-choosen when the report loads (as long as you store the selection under the property "general" when it changes, more on that later).  So don't call APF from update()

But I really wanted to pick the first or last item by default.  The change was to be sure to never call APF from update() more than once.  I was already detecting the first call to update() after the constructor, then it was just a matter of:
  • If it isn't the first call to update() don't call APF.
  • If it's the first call to update() and only if the current selection isn't the one you want call APF.
In this version, onChange() isn't called during a call to update()
With this change to the logic, APF could only be called w/o user intervention once after the report loads, and so no loop.

Thursday, May 10, 2018

Coding PowerBI Custom Visuals

In my last post I discussed a need for a new slicer visual for Power BI.  There's only one slicer visual built into Power BI.  It's pretty good in most cases.  The Power BI Slicer visual provides the following selection modes:
  • List - for all types
  • Dropdown List - for all types
  • After, Before, Between, Relative - for dates
  • Between, Less than or equal, Greater than or equal - for numeric values
Pretty powerful set of choices.  Plus Power BI provides special handling for the slicer visual.  When you cut and paste a slicer from one page to another page, Power BI offers to automatically synchronize choices.  And if you didn't go that route, the View tab in the Ribbon has a checkbox to show the "Sync slicers" pane.  Selecting the Slicer visual in the report area will update the Sync Slicers pane, and show you all of the other pages where a Slicer is using the same field to filter content on the page.  Overall a valuable feature for reports with multiple pages of related information.

But... What if you have a need to filter a report by a single discrete value out of a large set of values?  The List/Dropdown List isn't a very good option, and if it's dates, the range selection can be clumsy...

So with that said, I jumped right into building my own slicer.  Requirements:
  • Work with large set of discrete values
  • Provide forward and backward paging
  • Provide a thumb to drag
  • Provide a text box for direct entry
Also, it should have some validation on text entry and paging to keep it in bounds.  It would also be nice to remember the last selection, or default to the first value or last value when reloading the report.

This was the easy part.  Next up, I'll write up the steps I took to put the feature together.

Monday, April 30, 2018

Power BI Custom Visuals

The last few weeks I've journeyed into the strange realm of PowerBI Custom Visuals.  My goal was to create a new slicer that picks a single value from large set of values.  We have a need to look at daily reported values.  The Range picker won't work well because it's difficult to pick single day.  The drop down works well when there's only a handful of items.  But, what if you're working with a timeline, especially when there will be hundreds or thousands of choices.

In, comes the custom visual.   I blended a jQuery UI Slider with a text input box, and two spans styled as buttons.  The user can use the increment and decrement buttons to move to the next item, click the bar or drag the thumb to zoom to a location, or enter the exact value they are looking for.  There's some validation built in.  For instance, manually entered values are checked against the list of possibles.  The user can't make the control increment or decrement pas the end of the sets...


Next post, getting into the dirty work of implementing the visual.  The whole thing is a TypeScript project following the Node.js patterns.  NPM works great to add some of the common features, but the uncommon ones?  I may have not followed the specs perfectly when including custom JavaScript (jQuery UI + code to implement the combined UI elements), but it's working at the moment.  I'll be digging into how exactly to bring these custom features into a project correctly, as it appears that "non project" code should be include through NPM...

Wednesday, January 10, 2018

SharePoint CSOM failures 400 Bad Request

So, I have a monolithic development farm (DC, SQL Server, SharePoint 2016) all in one VM that I use to develop solutions for SharePoint.  I had Visual Studio 2015 installed, but my coworkers wanted to start using Visual Studio 2017.

As you probably know, when you uninstall Visual Studio, it doesn't uninstall all of the stuff that comes along with it.  So I removed all of the packages installed on the same date as Visual Studio 2015.  The only thing is, I uninstalled WCF Data Services as well (v 5.6.0.0).  I don't know why it wasn't listed on the day I installed SharePoint, maybe it was, and maybe I was a bit aggressive.

Well it turns out that CSOM requests (Microsoft.SharePoint.Client.ServerRuntime) and it is dependent on Microsoft.Data.Edm and Microsoft.Data.OData (both v 5.6.0).  These are both prerequisites for SharePoint 2016, but don't show up as a problem when just accessing the site.  Here's the PowerShell code that would trigger the issue:


# $ctx is a valid, initialized ClientContext
$ctx.Load($ctx.Web)
$ctx.ExecuteQuery()  # throws a 400 Bad Request exception


I first found the problem by trying to access the site via CSOM.  Then I upgraded to a newer CU and PSCONFIG.exe failed.  Checking the PSCONFIG.exe log I found I had the same problem. That lead me to this support post SharePoint 2016 Configuration failed, and it set me on the track to solve the issue.

I first tried to replace the individual packages, but that didn't work very well (I couldn't seem to download the right packages).  So I re-ran the SharePoint prerequisite installer and that was the key to success.

Here's some of the errors from various logs that lead me to the solution.  Maybe by posting these errors, it will draw people to this page if they come across a 400 Bad Request error from CSOM code.

From the Upgrade log:
Exception: Could not load file or assembly 'Microsoft.Data.Edm, Version=5.6.0.0, Culture=neutral, PublicKeyToken=31bf3856ad364e35' or one of its dependencies. The system cannot find the file specified.

Exception: Could not load file or assembly 'Microsoft.Data.OData, Version=5.6.0.0, Culture=neutral, PublicKeyToken=31bf3856ad364e35' or one of its dependencies. The system cannot find the file specified.


From the ULS Logs:

Error when processing types in server stub DLL Microsoft.SharePoint.Client.ServerRuntime, Version=16.0.0.0, Culture=neutral, PublicKeyToken=71e9bce111e9429c, Error=System.Reflection.ReflectionTypeLoadException: Unable to load one or more of the requested types. Retrieve the LoaderExceptions property for more information.     at System.Reflection.RuntimeModule.GetTypes(RuntimeModule module)     at System.Reflection.Assembly.GetTypes()     at Microsoft.SharePoint.Client.ProxyMap.ProcessOneAssembly(Assembly azzembly, ClientServiceHost processorSurrogate)     at Microsoft.SharePoint.Client.ProxyMap.Init(ClientServiceHost processorSurrogate)

System.IO.FileNotFoundException: Could not load file or assembly 'Microsoft.Data.Edm, Version=5.6.0.0, Culture=neutral, PublicKeyToken=31bf3856ad364e35' or one of its dependencies. The system cannot find the file specified.  File name: 'Microsoft.Data.Edm, Version=5.6.0.0, Culture=neutral, PublicKeyToken=31bf3856ad364e35'  

System.IO.FileNotFoundException: Could not load file or assembly 'Microsoft.Data.OData, Version=5.6.0.0, Culture=neutral, PublicKeyToken=31bf3856ad364e35' or one of its dependencies. The system cannot find the file specified.  File name: 'Microsoft.Data.OData, Version=5.6.0.0, Culture=neutral, PublicKeyToken=31bf3856ad364e35' 

Wednesday, November 8, 2017

Connecting SharePoint On Premesis with Azure AD : Protocol Sequence

As promised, here's a post on the design for a Security Token Service (Identity Provider) that integrates SharePoint (2010, 2013, or 2016 take your pick, one service covers all versions) and Microsoft's Azure AD (a.k.a. Passport, Windows Live ID, XBox Live ID, Live ID, Windows ID). The premise for such: Microsoft used to provide claims-based authentication for Windows Live IDs, but seems to have lost interest in supporting the interface (the certificate expired October 29th, 2013). Further, SharePoint doesn't accept OAuth2 tokens (even though it will provide them for "Apps").

Hence, an interface layer is required to translate OAuth2 tokens (provided by the Azure AD login service) to a SAML 2.0 token that can be consumed by SharePoint.  The following diagram is a high level UML Sequence diagram depicting an unauthenticated Browser (User Agent), SharePoint (Service Provider), Security Token Provider (a.k.a. STS, Identity Provider), and Azure AD (OAuth 2.0 Identity Provider).


So you may ask: Why not use the Azure AD SAML protocol endpoint?  This is a really great question!  When we started the project, information on the endpoint didn't come across our search scopes. Also, we had developed a number of Identity Providers integrated with web applications that inherited identity properties from a number of sources. Alas, as it turns out, none of these really mattered, because the Azure AD SAML protocol endpoint is described as an Oasis WS-Federation endpoint using three different signing certificates.  This is something that SharePoint just cant consume (yet).

Here's some of the reasons why the Azure AD SAML endpoint wouldn't work:
  • SharePoint can't consume the WS-Federation Identity Provider Identity Provider descriptor directly.
  • Azure AD's Identity Provider endpoint lists three signing certificates, where SharePoint maps a single certificate to an Identity Provider
  • Azure AD requires a Metadata URI from the Service Provider which SharePoint doesn't provide natively. 
  • Azure AD provides so many SAML assertions that SharePoint just doesn't need.  This isn't really a failure, but something that can cause the SharePoint "Share UI" to become confused when assigning claims.

Monday, October 30, 2017

Integrating your App with Office 365 and Azure AD

Hey all, I recently built a project that integrated Azure AD users (read this as Pasport, Xbox Live, Live ID, Windows ID, Azure AD, or what ever you really want) with SharePoint 2016 on-premises.  Pretty straight forward task, build an OAuth2 application that converts to SAML 2.0 Passive Authentication, configure to authenticate with Azure AD and pass the info off to SharePoint.

Microsoft has some really great examples, that are built right into the App registration portal at https://apps.dev.microsoft.com.  My task saw me building a "Web Platform" app.  The how-to was straight forward, and I followed the steps in from the Guided Setup option when I registered my App.  I choose "Server-side Web App," with the ASP.Net Web App (OWIN) guided setup.


The walk through is really great and even points some optimizations to ensure all of your MVC app is secured, vs. only the sign-in and sign-out actions.  The example even provided a second controller (/claims) that helps you debug the results you get back from Microsoft.


The Pros


Probably the best thing about the sample is that it immediately shows authentication against the "Common" logon portal.  This is essential for the application we were building, as very few of the users logging in would be from our organization.  The other thing was that it just worked straight out of the box.

Everything was straight forward, copy code, add it to your app.  Git some OWN packages and link them in too.  Took me less than an hour to get everything up and running.

The Cons


So, Microsoft didn't follow their own best practices when putting the sample together with the default App registration.

It turns out that the whole system works great with the Office 365 out of the box security configuration.  But some of our clients opted to configure their tenant to disallow users from consenting to data sharing.  There's one setting that is either labeled differently in the Admin Portal and again in Azure AD configuration, or one directly changes the other (in the end they're a single setting).  In the Admin Portal it's Settings -> Services & Add-ins -> Integrated apps.  In Azure AD it's Azure Active Directory -> User Settings -> Enterprise Applications, Users can consent to apps accessing company data on their behalf (See below for screenshots).

When these are disabled, a Global Administrator must consent to the application to allow non-administrators the ability to log-on.  Without that special consent, the admins can logon but no-one else.


Try as we might we just couldn't shake the error:

You can't access this application
<FooBar App> needs permission to access resources in your organization that only an admin can grant. Please ask an admin to grant permission to this app before you can use it.

We followed every direction given to compose the admin authorization consent URL and consent to the application.  Finally, based on a single article on Stack Overflow, we learned that the "Dynamic Scope" must match the "Microsoft Graph Permissions" configured in you application.  When a Global Admin consents to an application, he/she is only consenting to those Permissions found in the App Registration, and not to a Scope passed in the consent URI.  Supposedly, it was a new change...

The Fix

I wasn't sure how to harmonize the Microsoft Graph Permissions with what every my client was sending.  To my knowledge, it wasn't sending anything.  Then I started digging.  In Step 2 of the guided setup (Titled Setup), you add a class derived from Object called StartupOWIN apparently looks for this class when the assembly is loaded.  I highlighted a line below.

public class Startup
{
    string clientId = ConfigurationManager.AppSettings["ClientId"];
    string redirectUri = ConfigurationManager.AppSettings["RedirectUri"];
    static string tenant = ConfigurationManager.AppSettings["Tenant"];
    string authority = String.Format(CultureInfo.InvariantCulture, ConfigurationManager.AppSettings["Authority"], tenant);

    /// <summary>
    /// Configure OWIN to use OpenIdConnect
    /// </summary>
    /// <param name="app"></param>
    public void Configuration(IAppBuilder app)
    {
        app.SetDefaultSignInAsAuthenticationType(CookieAuthenticationDefaults.AuthenticationType);

        app.UseCookieAuthentication(new CookieAuthenticationOptions());
        app.UseOpenIdConnectAuthentication(
            new OpenIdConnectAuthenticationOptions
            {
                ClientId = clientId,
                Authority = authority,
                RedirectUri = redirectUri,
                PostLogoutRedirectUri = redirectUri,
                Scope = OpenIdConnectScopes.OpenIdProfile,
                ResponseType = OpenIdConnectResponseTypes.IdToken,
                TokenValidationParameters = new System.IdentityModel.Tokens.TokenValidationParameters() 
                                                       { ValidateIssuer = false },
                Notifications = new OpenIdConnectAuthenticationNotifications
                {
                    AuthenticationFailed = OnAuthenticationFailed
                }
            }
        );
    }

    /// <summary>
    /// Handle failed authentication requests by redirecting the user to the home page with an error in the query string
    /// </summary>
    /// <param name="context"></param>
    /// <returns></returns>
    private Task OnAuthenticationFailed(AuthenticationFailedNotification<OpenIdConnectMessage,
OpenIdConnectAuthenticationOptions> context)
    {
        context.HandleResponse();
        context.Response.Redirect("/?errormessage=" + context.Exception.Message);
        return Task.FromResult(0);
    }
}

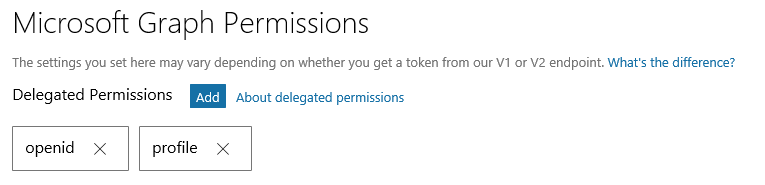
It turns out that the configuration was requesting openid and profile, but the default registration for my app granted access to User.Read.  As soon as I updated my registration to use only openid and profile, then used the Administrative Consent URL we were golden.


By the way, the Admin Consent URI is different for the V2.0 login endpoint, and has some limited documentation.  We used on like this:

https://login.microsoftonline.com/common/adminconsent?client_id=<APPID>&redirect_uri=<loginURL>

Just replace your App ID and Login redirect URL, and you'll be good to go!  For more reading on Admin Consent see:  https://docs.microsoft.com/en-us/azure/active-directory/develop/active-directory-v2-scopes