Microsoft has some really great examples, that are built right into the App registration portal at https://apps.dev.microsoft.com. My task saw me building a "Web Platform" app. The how-to was straight forward, and I followed the steps in from the Guided Setup option when I registered my App. I choose "Server-side Web App," with the ASP.Net Web App (OWIN) guided setup.

The Pros
Probably the best thing about the sample is that it immediately shows authentication against the "Common" logon portal. This is essential for the application we were building, as very few of the users logging in would be from our organization. The other thing was that it just worked straight out of the box.
Everything was straight forward, copy code, add it to your app. Git some OWN packages and link them in too. Took me less than an hour to get everything up and running.
The Cons
So, Microsoft didn't follow their own best practices when putting the sample together with the default App registration.
It turns out that the whole system works great with the Office 365 out of the box security configuration. But some of our clients opted to configure their tenant to disallow users from consenting to data sharing. There's one setting that is either labeled differently in the Admin Portal and again in Azure AD configuration, or one directly changes the other (in the end they're a single setting). In the Admin Portal it's Settings -> Services & Add-ins -> Integrated apps. In Azure AD it's Azure Active Directory -> User Settings -> Enterprise Applications, Users can consent to apps accessing company data on their behalf (See below for screenshots).
When these are disabled, a Global Administrator must consent to the application to allow non-administrators the ability to log-on. Without that special consent, the admins can logon but no-one else.


Try as we might we just couldn't shake the error:
You can't access this application
<FooBar App> needs permission to access resources in your organization that only an admin can grant. Please ask an admin to grant permission to this app before you can use it.
<FooBar App> needs permission to access resources in your organization that only an admin can grant. Please ask an admin to grant permission to this app before you can use it.
We followed every direction given to compose the admin authorization consent URL and consent to the application. Finally, based on a single article on Stack Overflow, we learned that the "Dynamic Scope" must match the "Microsoft Graph Permissions" configured in you application. When a Global Admin consents to an application, he/she is only consenting to those Permissions found in the App Registration, and not to a Scope passed in the consent URI. Supposedly, it was a new change...
The Fix
I wasn't sure how to harmonize the Microsoft Graph Permissions with what every my client was sending. To my knowledge, it wasn't sending anything. Then I started digging. In Step 2 of the guided setup (Titled Setup), you add a class derived from Object called Startup. OWIN apparently looks for this class when the assembly is loaded. I highlighted a line below.
public class Startup
{
string clientId = ConfigurationManager.AppSettings["ClientId"];
string redirectUri = ConfigurationManager.AppSettings["RedirectUri"];
static string tenant = ConfigurationManager.AppSettings["Tenant"];
string authority = String.Format(CultureInfo.InvariantCulture, ConfigurationManager.AppSettings["Authority"], tenant);
/// <summary>
/// Configure OWIN to use
OpenIdConnect
/// </summary>
/// <param name="app"></param>
public void Configuration(IAppBuilder app)
{
app.SetDefaultSignInAsAuthenticationType(CookieAuthenticationDefaults.AuthenticationType);
app.UseCookieAuthentication(new CookieAuthenticationOptions());
app.UseOpenIdConnectAuthentication(
new OpenIdConnectAuthenticationOptions
{
ClientId =
clientId,
Authority =
authority,
RedirectUri
= redirectUri,
PostLogoutRedirectUri = redirectUri,
Scope = OpenIdConnectScopes.OpenIdProfile,
ResponseType
= OpenIdConnectResponseTypes.IdToken,
TokenValidationParameters = new
System.IdentityModel.Tokens.TokenValidationParameters()
{ ValidateIssuer = false },
Notifications = new OpenIdConnectAuthenticationNotifications
{
AuthenticationFailed = OnAuthenticationFailed
}
}
);
}
/// <summary>
/// Handle failed
authentication requests by redirecting the user to the home page with an error
in the query string
/// </summary>
/// <param name="context"></param>
/// <returns></returns>
private Task
OnAuthenticationFailed(AuthenticationFailedNotification<OpenIdConnectMessage,
OpenIdConnectAuthenticationOptions> context)
{
context.HandleResponse();
context.Response.Redirect("/?errormessage=" +
context.Exception.Message);
return Task.FromResult(0);
}
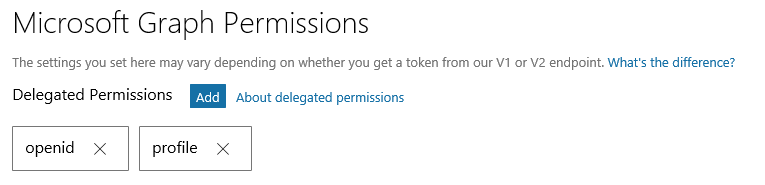
}It turns out that the configuration was requesting openid and profile, but the default registration for my app granted access to User.Read. As soon as I updated my registration to use only openid and profile, then used the Administrative Consent URL we were golden.
By the way, the Admin Consent URI is different for the V2.0 login endpoint, and has some limited documentation. We used on like this:
https://login.microsoftonline.com/common/adminconsent?client_id=<APPID>&redirect_uri=<loginURL>
Just replace your App ID and Login redirect URL, and you'll be good to go! For more reading on Admin Consent see: https://docs.microsoft.com/en-us/azure/active-directory/develop/active-directory-v2-scopes


